
That is so cool, right! The quinine in the tonic water causes it to glow under a black light! I made my ghost cupcakes with white frosting, so I used the recipe to add the tonic water to the frosting. If you want to use other colors, they won't glow with only using the tonic water in the frosting you have to use a mixture of gelatin, water and tonic water and dip your cupcake in it. I will explain in the recipe.
Here is the Recioe
Glowing Ghost Cupcake frosting
by
Prep Time: 20
Keywords: bake Halloween cake
Ingredients (24 cupcakes)
- 1 black light
- 24 prepared and cooled cupcakes
- 7 cups confectioners' sugar
- 1 cup vegetable shortening
- 1 teaspoon clear vanilla extract
- 5 tablespoons tonic water {diet tonic water works too}
- mini chocolate chips morsels
- Neon Food Color
- 0.3 ounce package of either Lime or Orange Gelatin
- 1 cup boiling water
- 1 cup chilled tonic water
Instructions
Prepare desired cupcakes and allow to cool. Begin frosting by adding confectioners' sugar, shortening, vanilla, and 3 tablespoons tonic water into a large bowl. Beat on low speed until no loss sugar is visible. Add remaining two tablespoons as needed to bring frosting to piping consistency. Mix at high speed for about a minute to allow frosting to become light and fluffy. Place half of white frosting into a separate bowl and set aside. Add neon food coloring to frosting until it reaches desired color {orange for orange gelatin, green for lime gelatin}.
Pipe colored frosting onto cooled cupcakes and place in the freezer for at least an hour. Meanwhile pipe white frosting on half of the cupcakes using a large round frosting tip. Add two mini chocolate chip morsels for the ghost's eyes to finish ghost cupcakes.
After lettering colored cupcakes freeze, prepare the gelatin by adding gelatin mix to 1 cup boiling water. Stir for about 2 minutes then add 1 cup chilled tonic water. Transfer to a container that will let you easily dip frosting into and place into an ice bath to cool. Keep gelatin in ice bath stirring occasionally until gelatin is cool but not yet set {about 5 to 10 minutes}.
When gelatin is cool to the touch take cupcakes out of the freezer a couple at a time. Dip into gelatin upside down, submerging the frosting but not the cake {it is ok for the gelatin to drip onto cupcake, just don't submerge it completely}. Rotate cupcakes dipping and then returning to the freezer for about a minutes to set gelatin, then re-dip. Dip 4 to 6 times for best results.
Refrigerate until a couple minutes before serving to keep gelatin set. Then place cupcakes under a black light and watch then glow.
ENJOY!!

I always used to get Caramel apples at the Halloween Carnivals at school, remember those! Ahhh the good old days! And winning the goldfish as a prize at the carnival.....every year I would win a goldfish! I can't wait till my three year old son is old enough to have a school Halloween Carnival, so much fun!
Here is the Recipe
Caramel Apples
by
Prep Time: 8
Cook Time: 2
Keywords: dessert
Ingredients (6 apples)
- 6 apples
- 1 (14 ounce) package individually wrapped caramels, unwrapped
- 2 tablespoons milk
Instructions
Directions
Chill apples in the refrigerator over night (it helps caramel set quicker)
Remove the stem from each apple and press a craft stick into the top. Butter a baking sheet.
Place caramels and milk in a microwave safe bowl, and microwave 2 minutes, stirring once. Allow to cool briefly.
Roll each apple quickly in caramel sauce until well coated. Place on prepared sheet to set.
Refridgerate for about 15 minutes to set caramel
Garnish anyway you like, dip in chocolate, nuts, mini chocolate chips, pipe chocolate over caramel or any other idea!
ENJOY!

Here is the Recipe
Caramel Apple Layer Cake
by
Prep Time: 45
Cook Time: 35
Keywords: bake dessert cake
Ingredients (8 inch cake)
- 4 cups all-purpose flour
- 2 teaspoons baking soda
- 1 teaspoons baking powder
- 1 teaspoon salt
- 1 teaspoons cinnamon
- 1/2 teaspoon ground allspice
- 1/2 teaspoon ground cloves
- 1 1/2 cups (3 sticks) unsalted butter, cut into 1-inch cubes, at room temperature
- 2 1/2 cups sugar
- 2 large eggs
- 4 cups unsweetened applesauce
- Yield: about 2 cups
- 1 1/2 cups sugar
- 1/4 cup corn syrup
- 1/2 cup (1 stick) of butter, softened, cut into 1/2-inch cubes
- 1 ½ cups heavy cream
- 1½ cups sugar
- 1⁄3 cup all-purpose flour
- 1 1/2 cups whole milk
- 1⁄3 cup heavy cream
- 1 1/2 cups (3 sticks) unsalted butter, soft but cool, cut into small pieces
- 1 teaspoon pure vanilla extract
- 1⁄3 cup plus 2 tablespoons Classic Caramel Sauce (see recipe above), at room temperature
Instructions
Method for Apple CakePreheat the oven to 325-degrees. Butter three 8-inch round cake pans, line the bottoms with parchment paper, and butter the parchment. Dust the parchment with flour and knock out the excess flour.
Sift the flour, baking soda, baking powder, salt, cinnamon, allspice, and cloves together into a large bowl. Set aside.
In the bowl of a standing mixer fitted with the paddle attachment, beat the butter until creamy, about 4 minutes. Add the sugar and beat until light and fluffy, about 3 minutes. Add the egg and beat until combined.
Add the flour mixture to the mixer bowl in three parts, alternating with the applesauce, beginning and ending with the flour mixture. Scrape down the bowl, then mix on low speed for a few more seconds.
Divide the batter among the prepared pans and smooth the tops. Bake for 40 to 45 minutes, rotating the pans halfway through the baking time, until a toothpick inserted in the center of the cake comes out clean. Transfer the pans to a wire rack and cool for 20 minutes. Turn the cakes out onto the rack, remove the parchment, and let cool completely
Method for Caramel SauceIn a medium saucepan with high sides, combine the sugar and corn syrup with 1/2 cup water. Stir the mixture gently so you don’t slosh any of it up the sides of the pan. Turn the heat to medium-high and continue stirring until the sugar dissolves. Increase heat to high, stop stirring, and allow the mixture to boil. Once it begins to turn a rich caramel color (if you don’t want to eyeball it, take the caramel to 300 degrees F on a candy thermometer), remove it from the heat, add the butter and cream, and stir until combined.
You can save the caramel sauce, tightly covered, in the refrigerator for up to 1 week. Let it come to room temperature before using it on cakes, ice creams, or quick breads.
If you want a warm topping, heat the caramel sauce in short bursts in the microwave or in the top of a double boiler.
Method for ButtercreamIn a medium, heavy-bottomed saucepan, whisk the sugar and flour together. Add the milk and cream and cook over medium heat, whisking occasionally, until the mixture comes to a boil and has thickened, about 10 to 15 minutes.
Transfer the mixture to the bowl of a standing mixer fitted with the paddle attachment. Beat on high speed until cool. Reduce the speed to low and add the butter and vanilla; mix until thoroughly incorporated. Increase the speed to medium-high and beat until the frosting is light and fluffy.
Add 1⁄3 cup of the caramel and continue mixing until combined. If the frosting is too soft, put the bowl in the refrigerator to chill slightly, then beat again until it is the proper consistency. If the frosting is too firm, set the
bowl over a pot of simmering water and beat with a wooden spoon until it is the proper consistency.
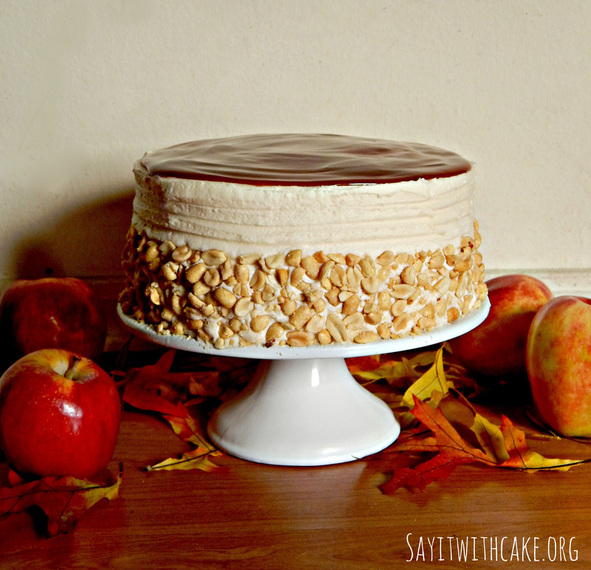
Assembly of cakePlace one of the cake layers on the cake base and level off the top. Put a thin layer of caramel sauce on the layers and then spread caramel buttercream on top. Next, add another layer of cake and level and frost as you did with the first layer. Trim the top of the last layer and then place it on top of the cake bottom side up. Spread a very thin layer of frosting over the entire cake (crumb coat) and place the cake on the fridge for 30 minutes. Remove the cake fro the fridge and use the remaining frosting to ice the top and sides. Use the remaining caramel to drizzle over the top. Add chopped peanuts, if desired.
Here are some pictures of the caramel in different stages of boiling
ENJOY!!

Since I live in San Diego, the summer is still going on over here! But for those of you who are yearning for summer to last a little longer, this cake can help bring back the feelings of summer!
Orange Creamsicle Cake
by
Prep Time: 20
Cook Time: 45 min
Keywords: bake dessert cake orange
Ingredients (8 inch cake)
- Cake:
- 1 box white cake mix
- 2 c melted orange sherbet
- 1 small pkg vanilla instant pudding
- 2 containers (6 oz) Yoplait orange creamsicle yogurt
- 3 eggs
- 2 tsp orange extract
- +Filling+:
- 2 pkgs instant vanilla pudding
- 1/2 c water
- 14 oz sweetened condensed milk
- orange food coloring
- 1 tsp orange extract
- 2 c Cool Whip
Instructions
For cake:
Combine all; beat 2 minutes. Pour into prepared cake pan(s).
Bake according to pan size directions on cake mix.
+Filling+:
Combine pudding, water, SC milk and extract.
Add food color to desired shade.
Fold in Cool Whip.
Refrigerate 30 mins. Spread between layers of cooled cake (thick).
Keep refrigerated, but this does hold up well at room temperature.
I used pastry pride and whipped it for about 7 minutes in the kitchen aid. I added 1 teaspoon of orange extract and a few drops of orange food coloring. Then I frosted the cake and made swirls on the top with a spoon. Super easy!
I really loved this cake and I hope you do too! Let me know what you think, I appreciate your comments!!
ENJOY!!!